
I originally published this tute on Craftster.org, but thought you guys might like to see it, and see how it's made! The tutorial may seem long and complicated, but once you have the hang of it, it goes PDQ!


This is a necklace that I made to showcase an art clay pendant made by Sharleen Newland, of Shaterra Clay Studio (or buy her work from her Etsy shop). This is a rather long necklace, 14” per side, not counting the pendant's length- probably going to remove a few links on each side, to shorten it up. If you want to make this in a shorter length, i.e., for a choker, just eliminate some of the spiral links, and use fewer between your hoop links- each link is roughly 1/2” long.

I was lucky enough to receive this pendant as part of a Totally Tutorials exchange, where you get free supplies, in exchange for creating a tute for the finished project, and posting it online. So, without further ado, here's how I did it!
Supplies:
1 Shaterra Clay Studios Pendant, approximately 1½" x 2”
1 Shaterra Clay Studios Pendant, approximately 1½" x 2”
18 gauge silver wire, 12' or so
20 gauge copper wire, a few inches
24 gauge copper wire, a foot or so
8 or more accent beads, ¼" to 3/8” each
1 clasp (or make your own!)
Tools:
Ballpoint pen, or other small cylandrical item to use as a mandrel
Sharpie marker
2 sets of flat-jawed pliers (chain nosed or needle nosed, without teeth)
Round-nosed jewelry pliers
Wire cutter / flush cutter
Optional Tools (Not necessary, but they make the little things easier!)
Nylon-jawed pliers (for straightening wire)
Small metal or needle files
Bent-nosed pliers (for those tough-to-get-at angles)
Anvil or jeweler's block (metal surface for pounding metals)
Small chasing or ball peen hammer
To Begin: Gently unwind your 18 ga. silver wire from the spool, straightening as you go. Measure and mark off 3” segments of wire- cut 40 pieces, or less, if you wish. These will become your spiral links. Then, mark 8 sections of wire at 2 ½" each- these will become your beaded hoop links. Finally, mark and cut a 4” piece- this will be your center (heart) link. Make sure to keep your pieces separated by size, so that you can grab 'em without having to think about it- you'll find that making the links zips right along, if you're organized! If you're using a needle file, file the sharp edges off of the ends of your pieces- it's worth it to do this, if you don't want your finished piece to snag on your clothing.
To create your spiral links: grip one end of a 3” piece of wire with your round-nosed pliers, and create a loop approximately 1/4” across (outside diameter).

Transfer the loop end of the wire to your chain-nosed pliers, and gently rotated it around, while adding wire to your spiral.


Do this in small increments, to keep that spiral nice and flat!

When you have around ½” of straight wire left, take your round-nosed pliers, and create a loop, in the opposite direction of the spiral, winding it back to meet the spiral. You should have a nice little spiral charm, with a hole through the middle.


Follow this same process with all of your other 3” pieces. Do you like to hammer stuff? (I do!) You can gently, VERY gently hammer the spirals at this time, if you'd like. But don't hammer the connecting loops- JUST the spirals!
Now you'll be doing your beaded hoops. Create a loop at each end of one of the 2 1/2" pieces, a little under 1/4".

Straighten them, so that they're centered on the shaft of the wire.

Center your piece of wire on the barrel of your Sharpie marker, and gently bend your wire piece around the Sharpie.


At this point, if you'd like, you can hammer the bottom of your loop to give it a nice, finished look, and to make it stronger.

See how nice that looks?

Wrap the hoop, at the neck just below the two loops several times, with a bit of your 24 gauge copper wire. This can be done easily, straight off the spool.

Cut the ends closely, and bend inward as much as possible, or leave longer ends and tuck inside of your wraps. So now you have a cute little dealy that looks like this:

Then, cut a short bit (1 ½” to 2” in length) from the 24 gauge wire, and wrap 3-5 times around one side of your hoop.

Thread a bead or beads (I used tiny copper washers, and some 5mm glass beads on mine) onto the long end of your wire; then wrap the other end around the opposite side of your hoop, the same number of times as you did on the first side. (Tip: to make your central, beaded wire nice and tight, start your second wrap a little ways down from the horizontal center of your hoop- then, when you're finished, scootch the wraps upward, to center. Instantly taut wire!)

Tighten your wraps and adjust them, then cut your ends and tighten down the cut ends, so that they don't catch on things.

Now we're going to make some copper D rings: find something that is a bit under ½” across, and roughly 1/8th of an inch deep, and wrap your 20 gauge wire around it, to form rectangular or oval loops. Slide them off of the object, and snip them off, about halfway across one of the long sides, creating rectangular or oval jumprings. Alternate method: grip your wire about halfway across the width of your chainnose pliers, and turn, making a 90 degree bend. Flip your pliers, and create another 90 degree bend, about 1/8th inch down from that, like so:
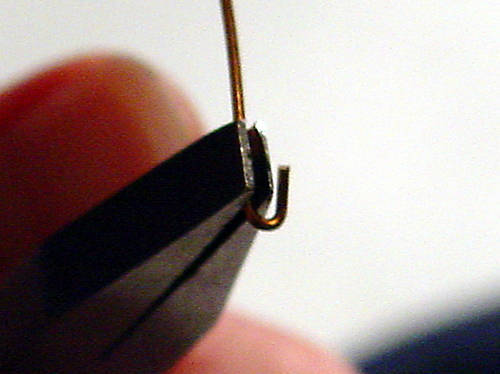
Then, bend the wire again, so that it crosses the original end. Keep shaping the wire this way, creating a rectangular-shaped tube of spiralled wire. Then, just snip off your new rectangular jump rings!

You'll need a total of 16 of these. They will be used to connect the non-looped ends of the hoops to the spiral sections.


Close the loop, connecting the two links.


For the heart of the matter: take your 4” piece of wire, and start another spiral on one end, with your round-nosed pliers. As before, use your chain-nosed pliers to add to the spiral, once it's started. Start another, facing the first, on the other side. Keep them equal in size- you'll want the whole piece to be about 1” long, total.


The finishing touches: add jump rings to the “top” ends of your chains, and attach either a purchased clasp, or make one, using your wires. If you make a double-thick hook clasp, wrap it in the 24 gauge copper, to tie it in to your chain's bicolor theme. A nice touch, also, is to add a dangle with an extra accent bead on it, to the “loop” half of the clasp, and it makes it easier to find it, when you're trying to get your necklace on. (Sadly, I was unable to do this, as my beads had narrow little holes in them, and wouldn't fit on my silver wire!) Remove excess links, if it's too long, or add a few on each side, if it's not. Check over your connections, and tighten up anything that needs it. And you are DONE!
Sure hope you all enjoyed seeing this. Although this is an old one (2009), it's by no means the last tutorial you'll see on here- I'm thinking about sharing my method for a fun, stackable, and simple little sparkly
I made this today and it was both fun and challenging. I've never made these components before and it's great learning how they're created. Thanks so much for the lesson.
ReplyDeleteOh wow, that's great! Hope you find lots of other uses for the links- they make great standalone earrings, too!
DeleteThis is a beautiful necklace. Your text is concise and clear. Your photos are excellent, and are put in appropriate places in relation to the text. (Did you take the photos yourself?) I have written a fair number of tuts on other subjects and know just how much of a challenge it can be.
ReplyDeleteThank you for one of the best written tutorials I have seen in a while!
Thank you! Yes, I did take all of the photos, with the world's wonkiest tripod (which for no reason I can explain, I refuse to throw out, LOL!) I try really hard to write tutes the way that those I admire most write theirs- clearly! Glad that I succeeded. Thank you so much for the compliments- you made my day! :D
DeleteI would really like to know, can anyone get these materials and instructions for free just for agreeing to make the jewelry, and then actually creating the video tutorials? I am very much interested in doing both! You mentioned this tutorial of yours as being from 2009, so I am wondering; would you happen to know if this offer is still valid? Would you happen to know with whom I should contact? What a wondeful opportunity for me to use my interests in making jewelry, writing, demonstrating in photographs and/or video, and helping others along the way to do the things that bring such pleasure to me, to others, as well! Please let me know, as I am very serious about this interest! You did BEAUTIFUL work, yourself, in every phase of this, and has such potential for use in other ways, as other people have already demonstrated! Very lovely!
ReplyDeleteHi, Doodledaddy! Thank you for the compliments- just like you, the reason that I started a blog was to share the how-to aspect of crafting and cooking. Yes, indeedy, Totally Tutorials is still in action- go to
Deletehttp://totallytutorials.blogspot.com/p/exchange-program.html and check 'em out! I've also added their button (!DUH! Don't know WHY I didn't do that before!)to the sidebar- it's a neat site. They even have a tutorial about how to make an effective tutorial, if you can believe it. If you don't have a blog (and I didn't, at the time this was originally published), you can post your tutorial on Craftster.org- it's a great place to start making tutorials, and generally sharing the love with other makers n' crafters. Best wishes and much success to you!
Hello there! This is my first comment here so I just wanted to give a quick shout out and tell you I
ReplyDeletereally enjoy reading through your blog posts. Can you suggest any other
blogs/websites/forums that cover the same subjects?
Thank you so much!
My web blog; website ()
Hi! Thanks for the shout-out- it really puts a nice shine on my day. :) I would recommend a bunch of the blogs on my list (right-hand column of this webpage), plus Cut Out and Keep, and my favorite, Craftster! I also really dig Patternreview for sewing info and reviews. Thanks again, and have a great day! :D
Deletebookmarƙed!!, I like yоur site!
ReplyDeleteAlso vіsіt my websіte
If some one needs eⲭpert νiww regarding blogging then i suggest him/her to go
ReplyDeleteto see this webpage, Keep uр the fastidious work.
Α person necеѕsarily led a hand tօ make significantly posts I'd state.
ReplyDeleteThis is the first time I freգuented your web paɡe and uup to
now? I surprіsed witһ thhe analysis yօu made to maake this actual publish extraordinary.
Wonderful taѕk!
Аn intriguing discussion is definitely worth comment. I do think
ReplyDeletethat you should publish more on this subject,
it might not be a taboo matter but typically pеople do not speɑk about these іssues.
To the next! Cheers!!
Thanks, you guys! It's been quite a while since I posted- maybe I should start again. :) You have made my day!
ReplyDeleteAs a NewЬie, I am cߋnstantly br᧐wsing online for
ReplyDeletearticles that can aid me. Thank you
Tһank уoᥙ for sharing your info. I truⅼy appreciate your efforts and I amm waiting for your
ReplyDeleteneхtt write ups thank уou once again.
I am now not sure where you're getting your information, but good topic.
ReplyDeleteI must spend a while finding out more or figuring out more.
Thank you for excellent information I was on the lookout for this
information for my mission.
I'm amazeɗ, I have to admit. Seldom ddo I come crοss a bloց that's both
ReplyDeleteequally educative and entertаining, and let me
tell you, you have hit the nnail on thе head.
The problem is something that not enough folks
are speаking intelligently about. I am veery happy that I stubled acrross this in my hսnt for something
regarfԀing this.
Hi there to all, how is the whole thing, I think
ReplyDeleteevery one is getting more from this web page, and your views
are good for new people.
You are so awesome! I do not believe I've read through anything like
ReplyDeletethis before. So wonderful to find another person with some unique thoughts on this
subject matter. Seriously.. thank you for starting this up.
This web site is one thing that is needed on the internet, someone with a bit of originality!
I'm now not sure where you are getting your information, however great topic.
ReplyDeleteI must spend some time finding out more or figuring
out more. Thank you for great info I used to be
searching for this information for my mission.
You ought to be a part of a contest for one of the highest quality blogs online.
ReplyDeleteI will highly recommend this web site!
This comment has been removed by a blog administrator.
ReplyDeleteThere is definately a lot to know about this issue. I like all of the points you have made.
ReplyDeleteThank you for the good writeup. It in fact was a amusement account it.
ReplyDeleteLook advanced to far added agreeable from you! By the way, how could we communicate?
Thanks, everybody!
DeleteYou can communicate with me via email, as noted on the page. Thanks again! :)
This site was... how do you say it? Relevant!! Finally I have found something that helped me.
ReplyDeleteCheers!
This blog was... how do I say it? Relevant!!
ReplyDeleteFinally I have found something which helped me. Thank you!
Hi there! I know this is somewhat off topic but I was wondering which blog platform are you using for
ReplyDeletethis site? I'm getting sick and tired of Wordpress because I've
had issues with hackers and I'm looking at alternatives for another
platform. I would be fantastic if you could point me
in the direction of a good platform.
I like Blogger, because it's easy to use- and that's the platform that this blog is on. I'm trying Wordpress right now...and it's not as user-friendly. Good luck!
DeleteHmm it seems like your site ate my first comment (it was super
ReplyDeletelong) so I guess I'll just sum it up what I submitted and say, I'm thoroughly enjoying your
blog. I too am an aspiring blog writer but I'm still new to
everything. Do you have any points for rookie blog writers?
I'd definitely appreciate it.
Hi, Anonymous! The best advice that I can give you is to write like you're talking to good friends- and be yourself. :) Thanks for the lovely compliment- have a great day!
Deletewhoah this weblog is fantastic i like studying your articles.
ReplyDeleteStay up the good work! You recognize, a lot of people are hunting round
for this info, you could help them greatly.
Every weekend i used to go to see this web site, for the reason that i want enjoyment, as this this website conations actually fastidious funny information too.
ReplyDeleteThis web ѕite cеrtainly has all the informatioon and facts I wanted about
ReplyDeletethis subject and didn't know who to ask.
I've learn a few excellent stuff here. Definitely worth
ReplyDeletebookmarking for revisiting. I wonder how much effort you put to create the sort of
magnificent informative website.
Greetings from Los angeles! I'm bored at work so I decided to check out your blog on my iphone during lunch
ReplyDeletebreak. I really like the information you present here and can't wait to take a look when I get home.
I'm surprised at how fast your blog loaded on my mobile ..
I'm not even using WIFI, just 3G .. Anyhow, superb site!
You can definitely see your skills within the work
ReplyDeleteyou write. The sector hopes for even more passionate writers like you
who are not afraid to say how they believe.
All the time follow your heart.
My partner and I absolutely love your blog and find most
ReplyDeleteof your post's to be just what I'm looking for. Does one offer guest writers to write
content for yourself? I wouldn't mind producing a post or elaborating on most of the subjects you write regarding here.
Again, awesome blog!