
As I mentioned in my previous post, I was a busy gal this weekend...

These diminutive pretties are part of the reason why! Wanna make some? This is a way-less-than-an-afternoon project, but the results...well, they speak for themselves! Plus, we're gonna play with hammers!
For each one, you will need:


And now we've messed up those perfect loops you just made. (Only a little bit, sheesh!) Tweak your loops with the round-nosed pliers, and make 'em pretty again.
Now we're going to shape your hoop from your double-eye pin. This is where the marker comes into play:


For each one, you will need:
Silver or silver-colored wire in these sizes:
1- 3" piece 18 gauge
1- 2 1/2" piece 20 gauge
1- 1 3/4" piece 20 gauge
And some:
28 gauge copper or gold-colored wire (use directly off of spool)- probably around 12"
And these tools:
Nylon-jaw pliers (to straighten and adjust wire)
At least one pair chain-nose or flat-nose pliers
Round-nose pliers
Bent-nose or smooth-jawed needle-nose pliers
Wire cutters / flush cutters
Small ball-peen hammer
Anvil or bench block
A fat highlighter or marker, to use as a mandrel
Cut your pieces of wire, and create two loops on the ends of your 3" 18 gauge piece:

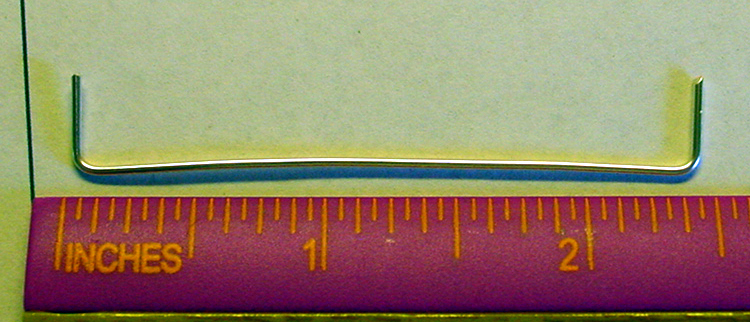
Bend the ends of the wire at a 90 degree (or slightly more!) angle, about 1/4" from the ends. This is how you'll start your perfect little loops...

Gripping the wire at the very end, roll the wire towards the center, changing position of your round-nose pliers frequently. Center your loop on the wire's axis- perfect!

This next step is optional, but I like to do this to help with the durability of the piece...when you "work" your wire, it gains tensile strength, and is less likely to bend out of shape. Gently hammer your loops with the flat face of your hammer.


And now we've messed up those perfect loops you just made. (Only a little bit, sheesh!) Tweak your loops with the round-nosed pliers, and make 'em pretty again.
Now we're going to shape your hoop from your double-eye pin. This is where the marker comes into play:

Start shaping the hoop around the pen.

Gently ease the looped ends up and out, just a bit- this will help with the next steps, aligning and binding them.

Using your nylon-jawed pliers, pull the looped ends together, like hands folded in prayer. Then CRUSH 'EM DOWN. (Well, this is about getting hammered and bound...*giggle*)
Now, you have a couple of choices. You're going to want to hammer your hoops, to give them strength- and you've got a ball-peen hammer to work with. This means that you can opt for a smooth look, using the flat face of your hammer, as shown at the top of the photo. Or, you can use the other end, and make a sparklier, rougher finish, as shown on the bottom. Both look good in their own right. I chose the rougher texture- I used a non-tarnish sterling-plated wire, and wanted it to glitter- those tiny facets really catch the light. If I was making a tarnished-and-buffed piece, though, the flat-hammered hoops would look just as great. Either way, gently and evenly hammer your hoops, widening the lower portion of them as you work.

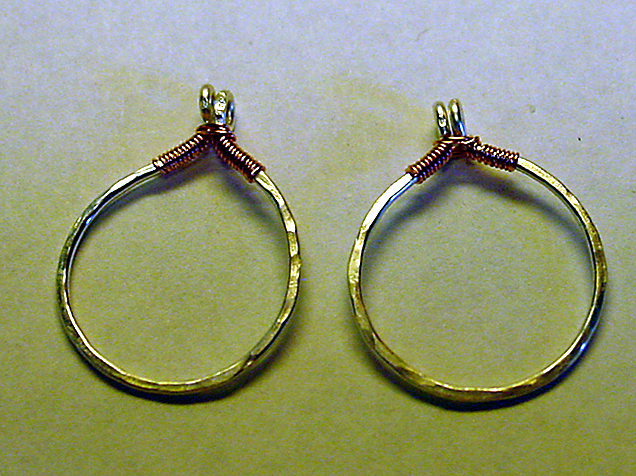
Now, start tying 'em up. Grab that spool of 28 gauge copper, and start wrapping one side of the hoop:

When your coiling reaches the length that you'd like, wind the wire a couple of times around the "neck" of the piece (where the two loops are) to bind it, and continue wrapping onto the other side. You'll now have this:

Check for the evenness of your wraps, snip your wire ends, and tuck them down tight, first with your nylon-jawed pliers, and finally with your bent-nosed or needle-nosed pliers (so they won't snag on hair or clothing).....
But, oh no! The hoops have deformed! They're *GASP* wonky!
This is where that pen will come in handy again. Take the cap off of your highlighter,
and pop the hoop onto it.


Slide the hoop UP the cap- you'll find that it's just a tiny bit wider than the barrel of the pen. Straighten the hoop, while rounding out the center- problem solved!
 |
| De-Wonked Hoops! |
Now the decorative fun begins! Take your 2 1/2" piece of 20 gauge wire, and make a little bend in the center.

Pull the ends inward, and cross 'em, creating a little teardrop-shaped loop in the center.

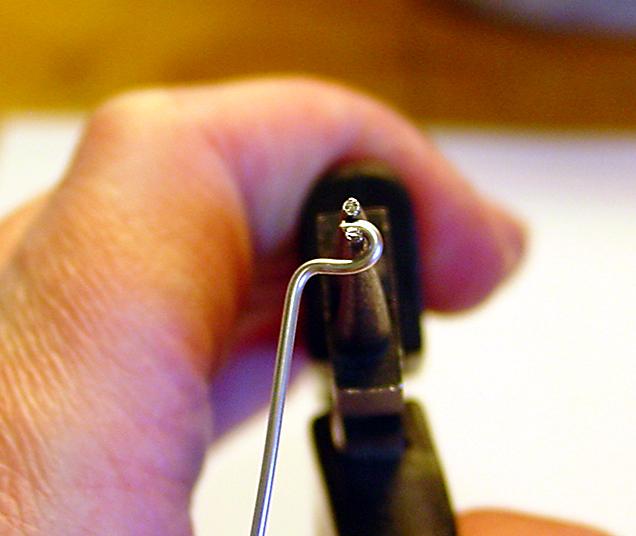
Using your chain-nose or needle-nose pliers, start a small, tight bend in one wire end, curling towards the teardrop:

Swap over to your round-nosers, and start a spiral on the end.


Now, swap over to your chain-nosed again, holding the curly bit flat in the jaws, and continue the spiral, gently rolling with your wrist.

Do this on both sides, until you have this:

Hammer your piece. It will turn the one pictured at the top, into the one at the bottom. Be careful not to nail the cross-over part too many times, but do bop it enough to flatten the piece out a bit!
Now comes the fun part- lay your hoop and decorative piece together, to get a rough idea of how you want them to meld. This is also a good time to straighten and adjust them to the size that you want them to be- that central teardrop shape will still have some flex to it, so resizing the piece is pretty easy.

(I started out thinking that these would be hung upside down, with a dangle, but changed my mind!)
Once you've decided on your positioning, bind one edge of the swirly to the side of your hoop, and make sure that it overlaps the hoop just a tiny bit- this will be the front side of the dangle.


Repeat on the other side of the hoop, taking care to overlap your front piece on the same side of the hoop.

Again, trim your wire ends and tuck 'em down.
Hmmm...Nice, but they need something.

So grab your last piece of 20 gauge wire- note that the shorter length will make it a little harder to work with.
Bend it in the center, as before, but use your round-nose pliers.


Much easier! Now, repeat what you just did with the longer piece, but this time, you'll probably only need the round-nosed pliers to do it. Hammer, as before, then straighten and adjust. And just as you did before, wire your little goody to the hoop, tuck in the ends, adjust the heights of your decorations, and....
You're DONE!

The finished hoops are around 1 1/8" to 1 1/4" in height- perfect for earrings or a pendant- maybe both!
Mother's Day is coming. (Yeah, I just said that like Ned Stark.)
I toyed with adding some peacock pearls...

But the Big Guy talked me out of it. (He was right, by the way. Don't tell him that I said so, though!)

Hope that you enjoyed this tute. As always, if you have any questions, please leave a comment below, or feel free to email me- I'll reply promptly! And share any variations that you come up with- I'd be happy to feature them, here on the blog!
Coming soon- what did I do to the flat hoops? And what do I plan to do with these?
You'll see! There is much, much more to come.
Until next time-
Be good to yourselves.
~
Those are gorgeous! And you make it sound so easy to make...thank you! : D
ReplyDeleteBrilliant! Thank you!
ReplyDeleteThey are Stunning!!!
Thanks, guys! You made my day!
ReplyDeleteBeautiful! I can't wait to try this. You do make it look easy! Thanks for sharing!
ReplyDelete:D Thank you!!!
DeleteThese are wonderful, I love them and can't wait to make them. Thank you for such a clear easy to follow tutorial!
ReplyDeleteThank you! :D
DeleteNot only was this tutorial clear and easy to follow, you made it fun too! Great job. Plan to make these soon - I see a small bicone crystal in the middle...
ReplyDeleteThank you! Let me know how they turn out for you- I'm feeling bad about not having new projects up just here lately. :/
ReplyDeleteThank you great tut and project
ReplyDeleteThanks so much- I'm sick, this weekend, and it's been awhile since I got anything DONE, so I've been feelin' doubly-low. This cheers me up!
DeleteI am a newbie and tried this. You made it so easy even I did it!! Thanks. I feel like a million dollars.
ReplyDeleteYay! Good- it's great to hear that- thanks for making my Monday! :)
ReplyDeleteThose are beautiful! I can't wait to try this.
ReplyDeleteThanks! Hope your project turns out GREAT! :)
ReplyDeleteThank you! You've made my day! :)
ReplyDeleteThis is such a gorgeous looking trinket! Thanks for the brilliant tutorial.
ReplyDeleteThank you! :)
DeleteGreat tutorial on a beautiful project!
ReplyDeletehi! love this post. Looks like something I might actually be able to do! :D How do I sign up to recieve posts from you?
ReplyDeleteYou can sign up for emails, up in the right-hand column- haven't been publishing much, as of late, but who knows? ;)
DeleteWhat's Happening i am new to this, I stumbled upon this
ReplyDeleteI've found It positively helpful and it has aided me out loads.
I'm hoping to contribute & aid different users like its helped me.
Good job.