


So what do you think...would you like some of these?


They're fast, easy, and fun to make. They're also durable, don't catch on things, and can be sanitized- perfect for work! (It was working in industrial laundry, and then in healthcare kitchens, that inspired their creation.)

Let's make some!
This is TIG or MIG welding wire. It's stainless steel, and can be purchased in large rolls. Don't let the initial cost scare you- I've been using this roll for, oh, about 20 years now, and I'm nowhere near to running out! Why are we using welding wire? It's strong, durable, and it's stainless steel- meaning that you can swim with your bracelets on, get 'em wet, even run 'em through the dishwasher, if needs be. (And if you work in healthcare, or a professional kitchen, they can be bleach-dipped!) Stainless wire won't deform easily, nor will it break easily. Also, it's springy, like memory wire, which makes it easy to put these on, and take 'em off, one-handed.


 |
| L: welding wire R: 20 ga. crafting wire |
They're very different, though. Stainless welding wire is stiff. As in, don't-bother-trying-to-shape-this-stuff-with-your-GOOD-pliers stiff. And since stainless wire doesn't mar or scratch much, it's OK to use your crappiest, strongest, oldest needle-nosed pliers, preferably a pair with teeth. However, you're going to want to use more than just the needle-nosers- grab all of these:

There are hints ahead that will tell you why. Oh, and you'll probably want to grab some wire dikes, as well- the cutter edge on the needle-nosers may not cut as close to your work as you'd like, and you do NOT want to use your good cutters on the stainless. It will destroy them, I guarantee it.
You'll also want to stop off at the local electronics store, and grab some of this- you're going to fall in love! (No, not with the guy behind the counter. With the tubing. You're going to loooove what you can do with it!)


You'll also need a lighter, some beads that will fit over the wire, and possibly a small container of water, if you don't have a sink near your working area.
HINT ALERT!
See this little hooky-thingy sticking out from the hole in the spool, made from the loose end of the wire? In craft wire, it's helpful. With welding wire, it is your very best bud.

Craft wire and other soft wires are relatively tame beasts. Welding wire is not. Welding wire is the rabid tiger of the wire world. It can, and will, tear you up. If you give it the chance, it will unspool at a rate faster than the eye can see, slashing you to pieces in the process. Don't give it that chance. Secure that end every time, and nobody gets hurt!
Bonus: You won't have to try to get it BACK on the spool. Trust me, when you're already bleeding and cursing like a sailor, re-winding that spool isn't what you're going to want to be doing. I know this from bitter experience.
So, now that you've been warned, let's get started-

Cut a little under one foot of wire off of the spool, in order to have enough to make your hook and loop, plus enough length for the bracelet. Measure down about 3/4", and make a sharp bend in the wire.

Crimp the bend over, so that both parts of the wire are parallel. Crimp it down TIGHT.

Here's where the extra pairs of pliers come in handy- grip your double-thickness of wire with a second pair of pliers, to stabilize it, at a little less than 1/2" from the bent end-

And use your needle-nose to wrap the short end of your wire around the longer section, two or more times. Wrap this as tightly as you can. If you can't tuck the very end up well, use the wire dikes to snip the end off, as closely as you can.
Now, chances are good that you've got something that looks like this, or close to it:

The stainless wire isn't going to let you shape it perfectly, like a softer wire would. That's OK. It'll all come out in the end, I promise. Heat shrink fixes all, including that potentially-stabby bit that wouldn't trim as closely as you'd hoped! Cut a short section from one of the smaller tubes of heat shrink, as small of a diameter as you can fit over the coiled (wrapped) part of your work, and wiggle it on there-


There! Looks better already, doesn't it? You can disguise a number of wireworking sins with this stuff. It's like Spanx for wire! Now, take your lighter, and heat it up. Try not to set it on fire- several passes with the flame should do the trick.

Try not to heat the metal too much, or it will melt through the plastic. (If you do have a melt-through, though, it's not the end of the world- just cool it down, pry off as much of it as you can, and then re-do it with a new section of shrink stuff. No one will ever know.) It's ready when it's shrunk down to about half of its original size, and is well-secured. At this point, cool it down with some water, and admire your work.

Still looks a little funky, right? That's alright. It'll all bend into shape.
Grab the doubled portion of the wire with your secondary pliers again, and start bending the end into a hook.

When the wire's a little over halfway bent over, go ahead and crimp it, just like you did before, to make a nice, neat hook. Note how the doubled wire doesn't look so wonky now- the bending evens things out, and the heat-shrink covers any distortions down below.


Now's the time to bead it up!
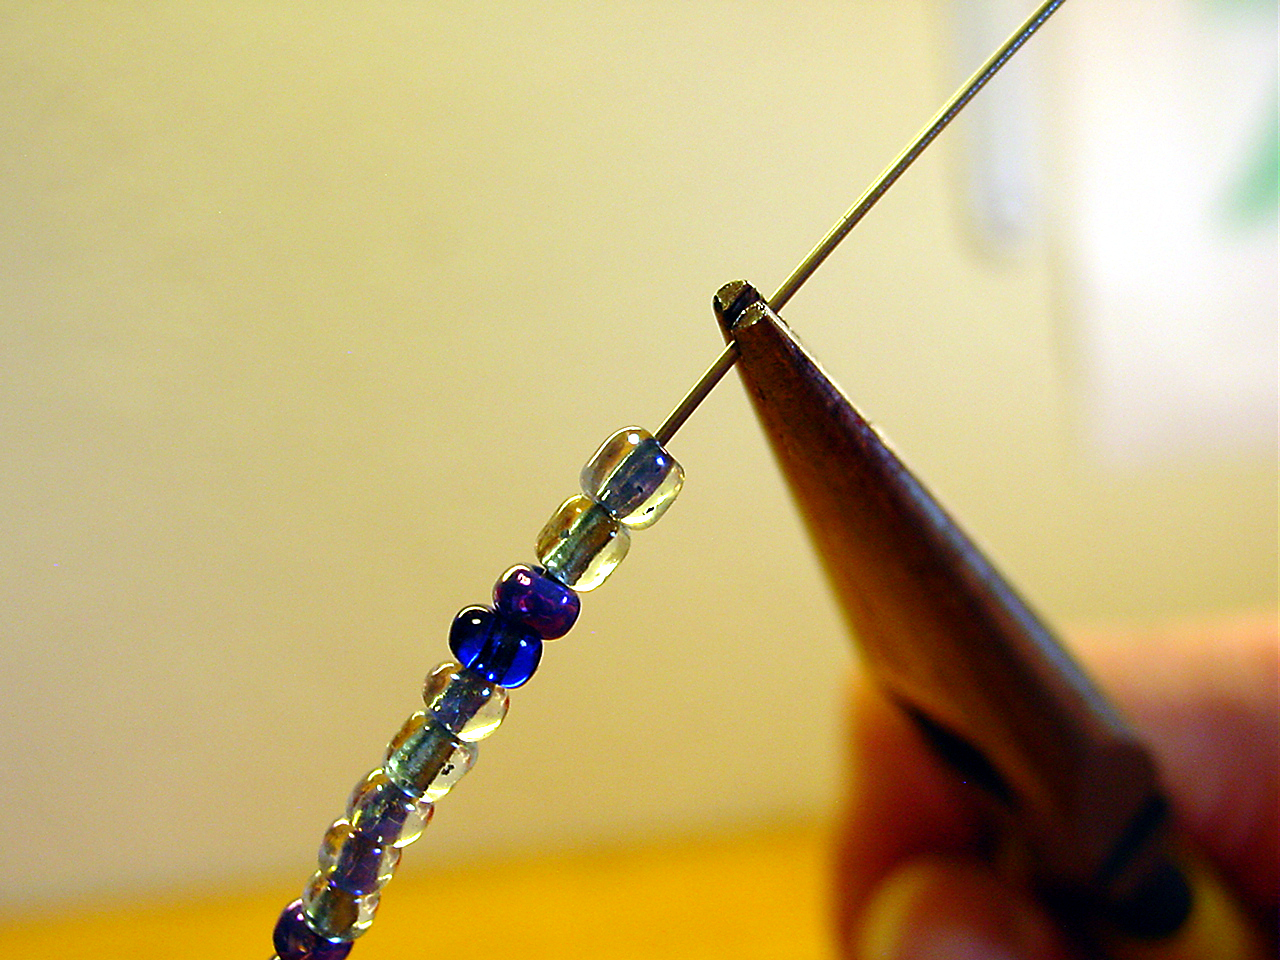
Once you've added your beads, check your length- is your beaded section about right, to fit closely around your wrist? Perfect!

Grab your tough pliers again, and grab that wire, leaving yourself some space from the beads. You're going to make a wrapped loop, at this end.
Once again, HINT ALERT! Here's how to make a perfect wrapped loop, every time, regardless of what wire you're using! The secret is...pliers. Lots of 'em, and changing 'em out, at each step. It'll seem as natural as breathing, after a couple of times, and you'll ALWAYS have perfect loops, every time. I promise.
Kink your wire over, hard and clean, a few degrees beyond the perpendicular. And get your many, many pliers ready to go.

Put down your needle-nosers, grab your rounded pliers, and fit 'em into the kink...

Start wrapping the wire around the top part of the pliers, keeping the kink in the same position as it started. In other words, move only the tail of the wire, around the pliers- don't start to straighten your loop just yet.

When it's about 3/4's formed, then roll your loop upwards-

And you'll have a perfect circle, with a tail-wire in the right position to start wrapping. It's a small detail, but it works, every single time!
At this point, you're pretty happy with that little circle of wire, and you want it to stay perfect, right? This is where your OTHER pliers come back into play again:

And don't worry about that gap- you want that there. Tell you why in a minute.


Trim and tuck the end, just like you did with the other one.
Locate a piece of tubing that will just *barely* fit over your loop, cut it-

Wiggle the Wire Spanx on there...

And get out the flamethrower again!

Note that your gap has all but disappeared. It hasn't, really, but you've left some "play" for your beads- some flex space. This is good, because when you bend, shape, and close your bracelet for the first time-

Conform it to your wrist:

And be proud of your new bracelet!

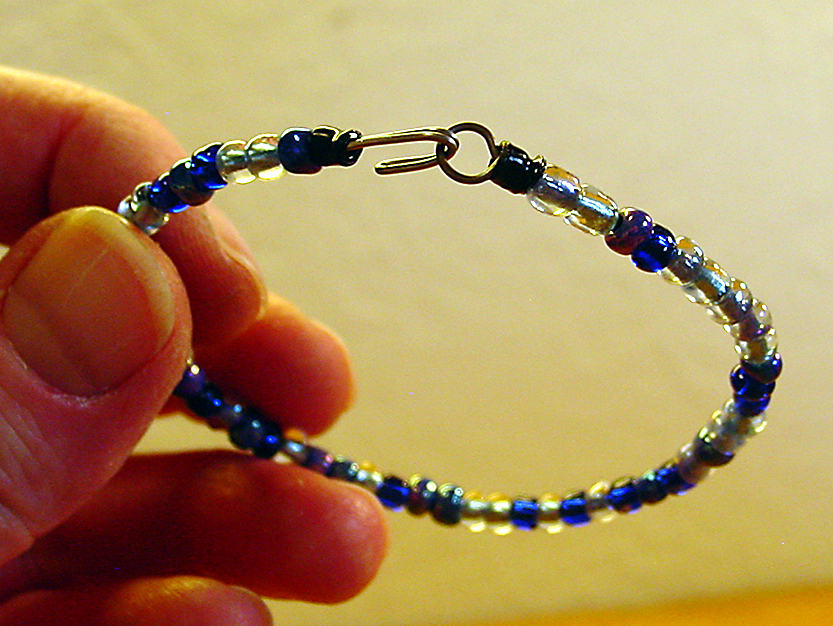

Awesome, right?
Great job!
Now, if you want to produce a whole buncha these little sparklies at the same time, or want to be able to throw one together at a moment's notice, make yourself a whole pile of bracelet blanks. Cut a bunch of wire sections, and just make the hooks, on one end. (I keep a whole pile of them, somewhere. I'd show them to you, but I can't seem to find them. So much for my organizational skills, eh?) When you run across some great new beads, or need something casual and simple to match to that fab new top (or even just your nail polish), you're set- just whip up a bracelet or three. The beading takes about 1 minute, and the finishing loop, about 2, max. Nearly instant gratification!
I hope that you all enjoyed this tutorial- and that you'll give stainless wire a try. It really is wonderful stuff, and it lasts. Most of these little goodies are over 10 years old, some as old as 20- and although they've been in numerous rivers, bays, workplaces, and everywhere else, they still look like they were just made.
I can't say that about many things in my life, can you?

Happy Good Friday, folks! You may hear from me this weekend, or you may not...the kiddos are (naturally) hyped about a certain rabbit's visit, and the sugar rush that accompanies it. May have my hands full. So if I'm not around-
Happy Easter!
~
Looks dangerous but what the hay, pretty nice when done. I have some of that shrink tubing around here, couldn't figure out how to make it work without one of them expensive hot air doo-hickeys, whew! What a relief, now if I could just find what I did with them. Lol. I've been wanting to make some thin, stackable bangles and these are definitely up my alley.
ReplyDeleteHaving worked in electronics for many years I know that you can safely use a hair dryer on high to shrink the tubing; it also comes in many colors! Happy beading!
DeleteOh my that is awesome, that would be so perfect for where I work at. It's dirty and people wear their bracelets there, but they get so dirty. This would be fabulous to make. Thank you for sharing this.
ReplyDeleteTeariana- you can thank my old friend, James, who taught me that almost any tool that you might not have can be improvised- hope you have fun making and wearing them!
ReplyDeleteRhonda- you're welcome! You won't regret making these- they really are tough, and much, much more sanitary than woven friendship bracelets- don't be surprised if coworkers ask you to make them for THEM, too. :)
Can you tell us where we can get the stainless steel welding wire? I sort of doubt my local Lowe's or Home Depot carries it. Not at their websites anyway. Thanks
ReplyDeleteYeah! First place to check is any welding suppliers in your area- you may be surprised how many are out there. Your second option is to find a vendor online- you're looking for stainless MIG wire, 308L .030" or .035" (although the .035" is going to be a little heavier, and thus more springy). I found two very good prices for this on eBay- here's the listings:
Deletehttp://www.ebay.com/itm/ER-308-308L-STAINLESS-MIG-WIRE-030-X-2-SPOOL-/130480040658?pt=LH_DefaultDomain_0&hash=item1e61376ad2
http://www.ebay.com/itm/ER308L-030-2lb-Stainless-Steel-MiG-welding-wire-/190835501660?pt=LH_DefaultDomain_0&hash=item2c6eaeaa5c
Both of these are at a very decent price. The going rate is generally from about $20-$25, but you may find an even better price at a local supply shop. Good luck!
thanks, I enjoyed your instructions and sense of humor so much and look forward to doing this! Do you have any other tutorials you are willing to share with us? Much appreciated!
ReplyDeleteNo, thank YOU- it's been a rough few days here at Casa Rodman, and this brightens my day! Yes, there are a bunch more tutorials- at the top of the page, click on "tutorials" in the "View Posts By Topic" thingy on the right-hand side. There's going to be more of 'em soon! :)
Deleteis there a substitute for welding wire? or what in the package size of welding wire do you get? I live in australia and stainless steel wire is quite pricey but i can get copper coated and ones like that but i don't know if it would rust?
ReplyDeleteA 2-lb. package of MIG wire is a LOT of wire- I'm still using the same roll I bought 20+ years ago, with no signs of running out. The 2-lb. is the standard roll over here in the States. I'm not sure how many feet/meters it is, to be honest. You could easily use copper craft wire- but bear in mind that it will not be as durable, or as springy. And you probably won't want to subject them to quite as much rough handling or throw 'em in the dishwasher...however, you'd be able to skip the heat-shrink, because with a softer wire like copper, you can make much tidier wrapped loops and hooks. Most craft wires and copper wires have a non-tarnish coating, so oxidization shouldn't be a major issue. Let me know how it works out! :)
DeleteLove, love, love this tutorial. YOu make it look so easy! going to try this - this weekend!!! what a wonderful way to make cool beaded bangles!!! thanks so much!
ReplyDeleteCool! Feel free to send me any pics- I'll post them on the blog! And thank you- I love hearing from folks, it makes doing the tutorials worthwhile. Have a great weekend!
DeleteWow. Love this idea. I am going to print it and try it sometime when I get a chance to find the wire and stuff needed. Sounds so fun!
ReplyDeleteGlad you like 'em- you can do so much with these, and they're so easy. :)
DeleteI love all the hints! Great images too. Never thought about using heat shrink tubing (we have tons of it and use it all the time in electronics). On that note, you've given me a bunch of new ideas. Thanks for the post and I love everything you made using this simple technique. Have a nice day!
ReplyDeleteThanks so much- you made my day! (Still recovering from the first cold/flu of the school year...)
ReplyDeleteThank you for this tutorial :)
ReplyDeleteWith photos it's easy, no need to translate haha!!!
Have a beautiful day :D
Thanks! Hope you have a beautiful day, too! :)
DeleteI just made my first one. The roll of 110 ft wire was about $5 - not bad and the heat shrink was about $2. Very neat! Thanks!
ReplyDeleteWow, you scored a BARGAIN on the wire- that's awesome! Hope you have as much fun with them as I do- they're such a great way to use just a couple-few inches of beads. :)
DeleteWow! Thank you for answering my comment. I have actually ordered some heat shrink in different colors for the ends - haven't gotten it yet. BUT, I wanted to ask you - could you use crystals instead - they are glass but I don't know if they would be able to hold up in a dishwasher or bleach. Got any thoughts on that?
DeleteI think crystals would work wonderfully for this! I'd recommend, though, that you not use the types with specialized finishes (i.e., aurora borealis, or other surface treatments of the glass). I've used seed beads with AB, and they've been fine, but I think maybe I just got lucky, LOL! Check to make sure that they're not just painted with color, too- I recently got some cut-crystal beads from a dubious dealer, and guess what? The glass isn't colored all the way through. Something like that won't hold up in the long run. But you should be good to go, if you use the good ones- glass is pretty much impervious to most chemicals. Thanks for commenting, and when you make some of these, let us know how they turned out! :D
DeleteI found your tutorial about a year ago and bought the welding wire from Tractor Supply. I found the heat shrink tubing and knew I was in business. Uh, wrong. I could not longer locate your tutorial UNTIL TODAY and I am sooooooooo excited!!! i felt like I have won the lottery!! I can't wait to try this if I can now reassemble all of the necessary equipment. Unfortunately I moved in the interim and my new bead room looks like a bomb hit it. I am hoping to locate everything this weekend and then have some fun! Thank you so much for this tutorial. Can't wait to see some of your others.
ReplyDeleteGood luck with organizing your new digs- I hate moving!!! ;) Enjoy!
Delete