

I also found a lovely string of "new jade" beads, and a baggie of tiny, smooth bead caps. As it happens, those bead caps fit a 3/8" bead perfectly- just right for the little jades. I knew there had to be a way to stretch those 25 pressed-glass beads just enough to make a full jewelry set- and I made it, just barely!


I'm not going to give a full tutorial on this, because most of the work was just stringing- but I will share some nifty little tips for making your strung jewelry long-lasting, and more professional-looking. Grab your tools, some beads, and your findings, and take a walk to the craftroom with me!
Now, I'd mentioned that there were only 25 of the floral beads, which meant that it was going to be tight. To start out with, I made my earrings- these are pretty basic, but I love how they turned out:

They consist of some "fancy" headpins, the floral beads, the new jade beads, and the bead caps- all I had to do was make some wrapped loops, connect them to some silver posts, and they were a done deal. Fast n' easy!
But for the bracelet and necklace, I used beading wire and crimps. There are a few things to know about using beading wire. The first and most important thing to know is this: never, never scrimp on your beading wire. Do not buy the cheapest, or the lowest-strand count. Always get the best stuff you can afford, because it matters- you'll never regret using the good stuff. When I first started making jewelry, the choices were few, and I made a lot of pieces with crappy tiger tail. You do not want to use that stuff- it kinks, it breaks, and it's just plain crummy. Spring for some Beadalon- with them, you're always going to get at least 7-strand. Anything lower-count than that is going to be poor quality, and not worth using. I use 19-strand most of the time- it's mid-range pricewise, hardly ever kinks, and it stands the test of time. For really nice stuff, I use the 49-strand, but for daily-wear jewelry, the 19 works well, and it's affordable. (BTW, guys, I'm not being paid or compensated in any way by Beadalon or their affiliates. This is just straight talk from someone who knows.)
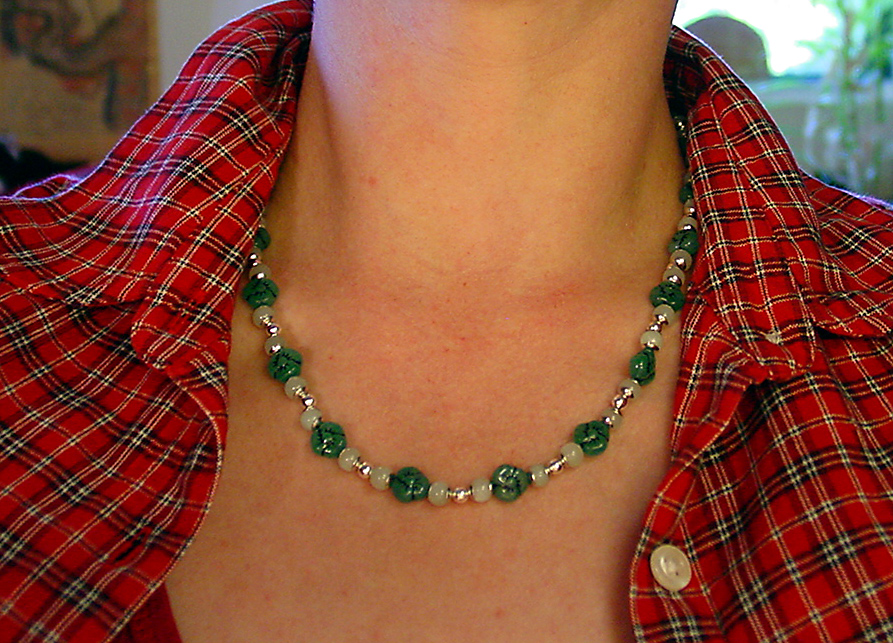
I'd also recommend getting wire guardians or French wire tubing, to protect your connecting ends, and get some crimp covers, too. These little things are inexpensive, but they do so much! They go a long way towards making your finished pieces look and feel fabulous. I've noticed, in talking with folks, that a lot of people feel that they don't know how to use them properly, so they shy away from them. Don't! They're so awesome! Let me show you how to make 'em work for you. Let's look at how this necklace went together:
 First, cut more beading wire than you think you'll need, about 6-12" extra, or work straight off of the spool. If you're not sure how your beading's going to go, and you're not ready to create a fully finished end yet, always put some form of stopper on one end- it'll save a lotta heartbreak. The last thing you want is to lose your entire strung pattern all over the floor, while you're trying to finish an end! I use a crimp that's too long or mis-shapen to work with a crimp cover, one that I'd never use for finishing a piece with. Coiled bead stoppers are great, too!
I strung my beads, and decided how I was going to finish the pattern at the ends. I came up with this repeat of the silver and jade, to add an inch to the ends.


Remove the bead that you're going to swap out, and replace it with a crimp. Then re-string the ending beads, and add a wire guardian at the end. If you've never seen one, they look like this:

They have a tube on each end for your beading wire, and the top area is grooved, to keep it in place. The name says it all- it really will protect that wire from fraying!

Thread the wire in one end, and back out the other.

Without kinking the wire, feed the end back through the beads, the crimp, and a couple more of the beads in the pattern. When it's tight in the wire guardian, close your crimp. Test your crimp- if it's not 100% solid, take it off and start over. This is why I use so much extra wire- just in case!

So, now it's cinched nice and tight, and that crimp's rock-solid.
But, there's no room now between the crimp and the next bead, towards the end. How do you fit the crimp cover on?
This! Gently push the ends of your wire guardian together. You'll get just that tiny extra bit of room on your wire, and the cover is going to fit in there perfectly! It's also going to take stress off from your wire, where it enters the guardian, making the necklace that much stronger.
 |
| The room that you need- right side of crimp |


Place the cover over the crimp, and close it. Go slowly, and watch carefully to make sure that it closes evenly. Adjust the position of your pliers as needed, and take it slow- it's a pain to remove a bad cover!

These covers are exactly the same size, closed, as the 4 mm silver beads in the necklace. BTW, it's also worth it not to scrimp on crimp covers- the good ones look and feel a lot nicer, and last longer, too. Quality plating is worth a few pennies more!

Can you spot the crimp cover? Unless the seam's facing you, NOPE! And the doubled-back beading wire is all the way back into the first flower bead. That's one seriously secured end!
Now that we've completed the easy end, let's roll out the second one. Replace one of the beads on the other side with a crimp, string the beads back on, and set up your wire guardian...


Gently work the wire back through a few beads, and tighten it up- but not quite as tightly as you did the other end. You're going to need a little bit of play in the pattern, or the beads are going to "sit" kinda wonky when you're wearing 'em.

Close your crimp, and just as before, test it for security.
If it's lookin' good, bend the ends of your wire guardian together, to get that little bit of slack for your crimp cover...you'll have a wider gap on your wire than last time, but you want it to be that way.

Pop the cover on, and close it down slow and easy...

Snip your wire end, being very careful to ONLY catch the loose end. Attach a clasp and a jump ring to close it...aaaaaannnnd-
It's done! And it's solid.
Be proud!
Be proud!
Gratuitous "Wearin' It!" shots:


Even my friend, Edward Third-Hands, was tryin' 'em out!
Ok, he got to wear 'em before I did. I'm generous like that. Edward can be such a tool about it, if he doesn't get to play dress-up first!
(Alright, alright! No more puns! Sorry.)
I hope these little tips and tricks help- there's probably a ton of tutes and books out there that share these same steps, but they weren't there when I started stringing...so I learned all of this the hard way. Hopefully, too, this'll spare you from being haunted by that disappointed "this-necklace/bracelet-just-isn't right" feeling. You'll have a piece of jewelry that you, or someone you love, will enjoy for many years to come!
Workin' on some other things here and there- the Tractor Shop's still crazy-busy, so my creative time's been a bit short...hope it's cool and calm in your world (not hot n' hectic like mine.) Be well and happy! XOX
~
Linking up to On Display Monday on Sowdering About In Seattle- thanks for having me on!
OMG! You are something else, yes, I mean that in a good way! Love your designs and instructions on jewelry making. Enjoy your sight 100%
ReplyDeleteThank you! :) You've made my day, Live For Beads!
DeleteI'm very new to beading. You give me courage to soldier on. Thank you, Jes
ReplyDeleteThanks, Jes! And happy Thanksgiving- I'm grateful to readers like you. :)
DeleteThank you so much for sharing your lovely pattern. And, thank you also for the humorous and brilliant tutorial on crimps, covers, wire guards and the importance of quality in wire, It was a real eye opener.
ReplyDeleteThank you, Candy! :) Glad you enjoyed it. Someday, I'll get back to blogging...your kind comments remind me. :)
DeleteHey, I think your site might be having browser compatibility issues.
ReplyDeleteWhen I look at your blog site in Opera, it looks fine but when opening in Internet Explorer, it has some overlapping.
I just wanted to give you a quick heads up! Other then that, great blog!